Pages

Thursday, 29 September 2011

We Three Kings

I'm still working on making simple cards.  I'm one of those people who don't feel that  a card is finished until it have flowers or ribbon or more on it.


This card was made by folding one sheet of A4 pearlescent card.


I added gold glitter border peel offs, two Kanban toppers and a couple of peel off snowflakes, which started off silver, so I had to colour them with a gold leaf pen.


I like this sentiment.  Simple bit effective.

I will be entering my card for the following challenges:-

Allsorts - Keep it simple
Crafty Creations - Clean and simple
My Time To Craft - Musical Medley - We three kings (Hymn/carol)

Tuesday, 27 September 2011

Bound in Orange

If you have been to my blog before, you may have seen a binder that I altered called Bound in Blue.  I made it to give my acrylic stamps a home and soon realised that I needed more.  I had to buy another two binders in fact.

Sorry.  Lots of pictures again.  I have started documenting how I make things. What works and what doesn't.  It means that I take a massive load of pictures of each project.  This is just a sample.


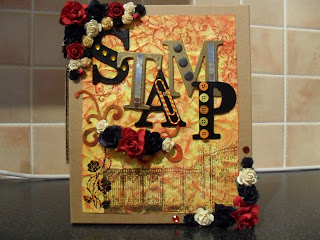
I got these chip board letters as part of a scrapbooking kit that I used to subscribe to.  They have never fitted in with a project I was making so they have been in my stash for about 5 years or so.  It suddenly occurred to me that they didn't need to stay this colour, so I inked and embossed them.


Voila, new letters that I can use.


My background paper was crated using mustard seed, dried marigold, spiced marmalade, rusty hinge and fired brick distress inks.  I have stamped and embossed a rose and a gate and fence along the bottom.  I have decorated a couple of the letters with mosaic mirror tiles.  First time I have used them and they turned out to be easy to use.


I bought this pair of earrings for a pond.  they are pretty long and I liked the tassels.  I've never worn them as they were bought specifically for my crafting projects.  Since I started using jewellery in crafting I have problems not seeing component parts that I can use in cards.  It's no longer just some thing to wear, I look at bits  more as what I can make out of them.  It's great.


I removed the hook from the earring and have hot glued the whole thing to my binder.  I'm quite pleased with how this turned out, as I had no plan for how it would look when I started it.  I just sort of played.


I am entering this binder for the following challenges:-

Crafty Cats Weekly Challenge - Autumn
Just Us Girls - Fall 3D project
Sparkles Forum Challenges - Something that sparkles - I have used a number of gems on this.

Sunday, 18 September 2011

Bound in Blue

At the moment all of my acrylic stamps are stored in a drawer and it is a bit frustrating finding the one that I want.  I bought this A5 binder from Paperchase for £3 to store them in.


It was just begging to be altered/decorated.


This is the backing paper I created using Faded jeans, Broken china, Shabby shutters and black soot.  I also used Black embossing powder and clear iridescent embossing powder for sparkle.  I had a lot of fun creating this.


The frame is made from grunge paper which I painted with crackle paint and then inked with faded jeans, Tea dye and vintage photo before coating with more clear iridescent embossing powder to give this sparkly effect.


You really need to click on this image to see the details.  There are close up pictures of the different areas here

I will be entering my binder in the following challenges.

Allsorts challenge blog - Alter or recycle
Creatalicious Challenge - Anything goes
Creative Inspirations - Anything goes
Fab N Funky - Bingo card (embellishment/ribbon/diecuts) (Embellishment/digi stamp/flowers)
MAWTT - Sparkle

Tuesday, 13 September 2011

Blue Steam

I only discovered Steampunk a month or so ago and I am totally hooked.  I find myself staring at objects thinking "what have you got inside you that I can use?"  I'm not sure how safe mechanical looking things are around me at the moment.


I love making trinket boxes and I actually woke up thinking about the idea for this one this morning. (How sad am I?)  This time I have used blue, brown and gold.  I have inked the sides in Faded Jeans distress ink.  I still haven't been able to get any cogs, so I am still making my own from snowflake die cuts.  This time I have inked them with Tea Dye distress ink and then used gold embossing powder to get a corroded metal look.  The bits where the tea dye show through look like rust.


 My image is Jayne Jettpack from Kenny Ks Steampunk Burlesque range.  Kenny K asked us to use pearls and pins for this weeks challenge.  I didn't have what I needed so I have put pearl beads onto normal pins and hot glued them into place.


I have given my butterfly a slightly corroded look using both gold and black embossing powder.  The flowers have also been given a dusting of embossing powder and then heated  a little with my heat gun.

I will be entering my little box in the following challenges:-

Craft your passion challenges - The "F" word - Flowers
Die cut dreams - Flower power - Use at least 5 flowers
Kenny K's Krafty Girlz - Pins and pearls
Paper take weekly - Things with wings  - Butterfly


Saturday, 10 September 2011

Never Ending

This is my first attempt at a never ending card.  Is that the right name?  I made it for my daughter who turned 18 on Thursday.  How old did that make me feel?


This is what I call the front of the card, or position one.   I have used Bo bunny flocked card stock, silver cardstock, black outline stickers, black co-ordinations card stock and Kenny K Digis


This is position two.  I have used five different images and have used the same four colours for all of their outfits.


This is position three.


And this is position four.  I put a personal message on the top section for her.


Never ending cards are not hard to make, but I did find this one time consuming.  It is well worth the effort though :-)

I am entering this card for the following challenges:

Paper Play Challenges - Use two or more stamped images - I used 5
Paper Take Weekly - Anything goes
Simon Says Stamp Challenge  - Multi-fold card
Stamp Something - Anything goes

Wednesday, 7 September 2011

Ians gone dotty

My friend from work Ian will be celebrating his birthday tomorrow.  He is great to work with and always remembers every ones birthday.  He is also a practical joker and we have all been on the receiving end of one of his pranks at one time or another.

Since he has opened his card, I thought it would be OK to post it here.


I had to take the picture late evening, so I apologise for the picture quality.

The background paper is by Bo Bunny and the dots are velvet flocked.  the i,age is a digi stamp from Teddy Bo.  I finally bought myself a Martha Stewart Border punch and the matching corner punch, so expect to see this a bit for a while :-).

Ian loved his card and it got a good giggle in the office :-)

I am entering this card for the following challenges:

Allsorts - Green and Blue
Cute Card Thursday - Use at least one punch
Fab N Funky - It's so funny
The Corrosive Challenge - Funny or use a pun

Sunday, 4 September 2011

Locked in Green

It is very rare for me to make a green card.  I'm not sure why, but I've given it a go for this card.  I've had a go a putting together a Steampunk Grunge card.  Not sure what I was doing, but I had fun.  Youtube is your friend when it comes to research.


I didn't have any cogs and I kept seeing them on steampunk cards, so I had a go at making some myself using some build a snowflake dies.  Many of the elements of this card have been copper leafed and embossed.  I also embossed the backing paper that I created using distress inks.  For full details on how I put this card together look here.


This is a close up of some of the elements that I made or coloured.  The little key on the right was a gold coloured earring that I took the back off of.  The heart (originally silver coloured) was a charm from a necklace that I bought and posted a little while ago.  The buttons were also originally silver coloured.


Lots of touches of gold pen on this image.  I have dragged a bit of vintage photo ink over the image as it stood out too much from the rest of the card.


This is a clearer image of the dry embossing.

I will be entering this card in the following challenges:

Fab N Funky - Go mad with embossing
Kenny K - Vintage / Grunge
Stamp Something - Use a Digi stamp

Xmas Folds

I have finally started making stuff for Christmas.  This is my first project.  I think I have been in denial for the last month or so, but I know that if I don't start now, I wont get everything finished in time.  I apologise for the number of  pictures in this post, but I think you will understand.


The original idea for my card came from a very talented lady.  Her blog is called Mariannes Papirverden .  I am very inspired by all of her makes.  I actually followed a tutorial on YouTube to make this.


When closed, my card measures 3"x6"


The inner part of the card was made from one sheet of A4 which I cut down to size.  I will lay flat when fully opened.  I have used a version of this fold before as shown here.


The back needed something so I have stamped a lovely little bear which shows up on a lot of my Christmas cards.


This is the front of the matching bag I made for the card showing the same little bear.  The bag is made from one A4 sheet of the same paper I used inside the card.


And the back.

I will  be entering my project for the following challenges:
Christmas Stamping All Year Long - Fancy Shmancy Folds
Crafty Creations - Dies and Punches
Creative Card Crew - Anything goes
Die Cut Dreams - Make a gift bag or box

Related Posts Plugin for WordPress, Blogger...