Pages

Showing posts with label distress ink. Show all posts

Friday, 9 November 2012

Such a long time

It has been ages since I have posted anything on here.  I have been busy doing stuff in RL, but I have found time to do a fair bit of crafting.

I have finally put he handle on this one.  I'm so pleased with how it turned out.


This started life as a pale wooden (pine I think) tea box that I bought on eBay.  I started off by staining it using Tea Dye distress stain.  Tea dye is my favourite colour in the distress range.  It gets used on almost every thing.

I then stamped it all over using vintage photo distress ink and a Tim Holtz script stamp.


I seen to have a thing about time lately.  Lots of cogs and clocks appearing on everything.  I love any thing that smacks of steampunk (NOT just sticking a cog on it) so I had a dig through my collection of steampunk charms and embellies.


I have added a few stamped clocks using brushed corduroy   The cogs and clocks where coloured using tea dye, vintage photo, aged mahogany and a bit of bronze acrylic paint.


A friend of mine gave me some stamped images.  This heart seemed to beg to go here.  It covered the seam of the box, so I had fun with a scalpel cutting it so that the box would still open.

I have another three projects on the go, so hopefully I will be posting again soon.

Happy crafting every one.

Tuesday, 27 September 2011

Bound in Orange

If you have been to my blog before, you may have seen a binder that I altered called Bound in Blue.  I made it to give my acrylic stamps a home and soon realised that I needed more.  I had to buy another two binders in fact.

Sorry.  Lots of pictures again.  I have started documenting how I make things. What works and what doesn't.  It means that I take a massive load of pictures of each project.  This is just a sample.


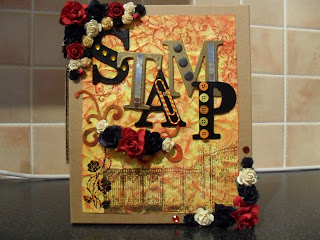
I got these chip board letters as part of a scrapbooking kit that I used to subscribe to.  They have never fitted in with a project I was making so they have been in my stash for about 5 years or so.  It suddenly occurred to me that they didn't need to stay this colour, so I inked and embossed them.


Voila, new letters that I can use.


My background paper was crated using mustard seed, dried marigold, spiced marmalade, rusty hinge and fired brick distress inks.  I have stamped and embossed a rose and a gate and fence along the bottom.  I have decorated a couple of the letters with mosaic mirror tiles.  First time I have used them and they turned out to be easy to use.


I bought this pair of earrings for a pond.  they are pretty long and I liked the tassels.  I've never worn them as they were bought specifically for my crafting projects.  Since I started using jewellery in crafting I have problems not seeing component parts that I can use in cards.  It's no longer just some thing to wear, I look at bits  more as what I can make out of them.  It's great.


I removed the hook from the earring and have hot glued the whole thing to my binder.  I'm quite pleased with how this turned out, as I had no plan for how it would look when I started it.  I just sort of played.


I am entering this binder for the following challenges:-

Crafty Cats Weekly Challenge - Autumn
Just Us Girls - Fall 3D project
Sparkles Forum Challenges - Something that sparkles - I have used a number of gems on this.

Sunday, 18 September 2011

Bound in Blue

At the moment all of my acrylic stamps are stored in a drawer and it is a bit frustrating finding the one that I want.  I bought this A5 binder from Paperchase for £3 to store them in.


It was just begging to be altered/decorated.


This is the backing paper I created using Faded jeans, Broken china, Shabby shutters and black soot.  I also used Black embossing powder and clear iridescent embossing powder for sparkle.  I had a lot of fun creating this.


The frame is made from grunge paper which I painted with crackle paint and then inked with faded jeans, Tea dye and vintage photo before coating with more clear iridescent embossing powder to give this sparkly effect.


You really need to click on this image to see the details.  There are close up pictures of the different areas here

I will be entering my binder in the following challenges.

Allsorts challenge blog - Alter or recycle
Creatalicious Challenge - Anything goes
Creative Inspirations - Anything goes
Fab N Funky - Bingo card (embellishment/ribbon/diecuts) (Embellishment/digi stamp/flowers)
MAWTT - Sparkle

Saturday, 16 April 2011

Chocolate Orange

If you caught my post yesterday, you will know that I am currently experimenting with my distress inks.  I've been eyeing up a few demos on timholtz.com to get some new ideas and I am starting to get a bit braver with trying things out.


Starting with a sheet of white paper I dabbed on Spiced marmalade and sprayed with water, did the same again with Tea dye and then finished off with Vintage photo.  I stamped the floral flourishes in Vintage photo and then embossed with some gold embossing power.  Now I don't have any distress embossing powder (definitely on my wish list) but I have attempted to get the same effect  by brushing some of the embossing power off before heating.

I loved the shimmer effect I got yesterday using the iridescent embossing powder, so I have done the same again (lightly sprinkle over some dabbed on distress ink and then heat).  It gives the paper a slightly rough feel and you can only see the glimmer when the card is facing a certain way, but I think it is worth it..

The colour scheme for this card came from the photo inspiration challenge at Paperplay challenges.  I don't know why, but chocolate and orange were the first things I thought of, so I ran with it.  That fit in very nicely with the chocolate challenge at Moving along with the times and the design came from the sketch at Everybody art.

If anyone has any comments tips or ideas for how I can improve my technique with distress ink, they are most welcome.  I love learning new things and blogging is a great way to do this xx

Friday, 15 April 2011

Evolution

I've called this one Evolution, because I started off with a piece of white card and four distress ink pads and waited to see what evolved :o)


I started by covering my white card in Mustard Seed distress ink and then went over that, in parts, with Dried Marigold.  I then finished off with a lot of Spiced Marmalade and a little Fired Brick around the edges.  The Dots and Best wishes were stamped using Fired brick and then I dusted the whole thing with iridescent embossing powder.  Now I never got the hang of embossing and this is the first time I have tried using the powder like this (the pots have been in the drawer for years), but I love the shiny effect it has given.


 The die cut was coloured using Mustard Seed, Spiced Marmalade and a little Fired Brick.  I then stamped with fired brick and played with the embossing powder again.  I have seen fake stitching on other peoples card and love the way that it looks so I have used my pokey tool (I don't know the real name for it)  to make  the holes.

I loved making this butterfly.  It was a white die cut to begin with, so I started with Dried marigold dabbed on to both sides, which I sprayed with a little water and dried using my heat gun.  I use make up sponges with my distress inks as I don't have the proper tool yet.  I did the same with a layer of Fired brick and finished with a little Mustard seed.  I have again stamped with Fired brick.  I did the same with my flower too.


I'm not entirely sure why I did what I did with the ribbon, but it seemed right at the time :O).  I love 3D elements on a card and get them in when ever I can.  I couldn't resist adding the buttons.

I will be entering this card for the challenges at My Time To Craft - On the spot and Papertake Weekly - Truely dimentional

Tuesday, 17 August 2010

Vintage Birthday

Hands up, who likes playing with distress inks?
.
.
.
Sorry, I had both hands in the air. I love them. I'm still working on buying the full set, but I have a good play as often as I can.

I've used every shade of brown that I have on this card. I actually made it last night, but had to wait until today to photograph it. I started with a white card blank to which I stuck some cream swirly patterned card. After a bit of ink play, I added a piece of die cut textured card (which I distressed and inked) and a card topper from my stash. I have added some Gems for interest and the flowers.


The design of this card was taken from the sketch on Friday Sketchers and as the card has what I think is a slightly vintage feel (still getting to grips with that one) I will be entering it for the monthly challenge over at Creatalicious Challenges.


Sunday, 28 February 2010

Shabby Vintage

I'm going to be honest. I have never made a vintage card before. This is for two reasons 1. I don't fully get what vintage is other than old looking and 2. I'm scared of it..... mainly all of the patterns I have seen used. Every time I buy a paper pack I get at least one page that I never use because it looks vintage. Well I think I have finally gotten to grips with my phobia and this is what happened.


Simon Says challenged us to make something vintage and to add flowers. At first I wasn't going to try, but I thought, "If you don't try you can't learn". I bought a papermania paper pack a while ago as part of a goody bag. I have to say that I don't know what to do with half of the papers, but they have inspired a lot of the orange cards that I have done lately. The paper I used on this card was one of the scarier ones in the pack. I edged the pieces I was using with fire brick and then I got a little too happy with the candle. I learned that adding distress ink and then setting light to the paper just makes it burn for longer (wont be doing that again).


Dotties world asked us to do some distressing which is where I got the idea for the pyromania.
I die cut some card and embossed it using a Fiskars texture plate. I coloured it with Aged mahogany and Fired Brick then sanded it in places until the white core showed through.

The flowers all started off cream. I have coloured them with three different distress inks and added gems to the centers. I have added a heart charm on chain to the main part of the card along with some ribbon and gems to the base for a bit of sparkle, which brings me on to the challenge at CRAFT challenge who wanted us to use ribbon and sparkle.
If anyone can give me some tips on vintage card making, I would be most grateful. Please feel free to tell me what I could have done better with this card as I learn from your comments.

Wednesday, 24 February 2010

Distressed Flame

Yes I know...... another orange one. I couldn't help it..... the colours were crying out to me.
On Tuesday A Spoonful of Sugar challenged us to use distress ink (did a little dance), pearls and glitter. So I pulled on a pair of latex gloves (having learned from blue dyed fingers last week) and started playing.

I wanted warm colours so I started with a sheet of orange and yellow paisley paper and the rest grew from there. I made an easel card using two yellow card blanks. I did this by cutting one of them in half to make the "front" of the card and folded the front of the second card blank in half. The left over half of the card blank was used to make the yellow strip across the middle and the two die cuts which I coloured with distress inks.

Enough techy stuff. I have used Spiced marmalade, Fired brick, Aged mahogany and Antique linen distress inks. The stamp is by Penny black and I have edged the image with clear glitter for some sparkle.


My eldest son said that it made him think of fire.... hence the name. The design is from the sketchat Papertake weekly, Everybody Art asked for an easel card and Kaboodles asked for fancy folds so I will be entering this card for those challenges too.

Friday, 20 November 2009

All inked up

Sometimes a card just happens. I was playing with my embossing folders and distress inks and this card.........happened. I really like this combination of colours. They are nice and bright and not at all Christmassy. It feels as though all I have made for a while is Christmas cards lol. (I started back in June.)


The colours that I have used are Broken china, Fired Brick and Spiced marmalade. The image is "Madison with attitude" from Charmed Cards and Crafts.


Cute Cards Thursday challenged us to make a project with teenagers in mind and I hope this fits the bill.

Sunday, 1 November 2009

Lacie Blue

The Sugar Bowl gave us a lovely sketch to work from this week. We had to use a Sugar Nellie stamp and lace.


The purple and blue background papers where created by using distress inks on white card and then embossing. I have also used some black ribbon for the detailing at the top of the card along with a couple of gems. The stamp is called "Just a girl" and is one of my current favourites.

Sorry the picture is so blurry.

Saturday, 24 October 2009

Thinking of you

A friend of mine at work is going through a tough time at the moment. I wanted to make her something that I hope will make her smile. Bizzy Becs has a challenge running at the moment where you have to use scraps that you have left over from other projects.

The pyramage is one that I put together several months ago, so the colours for the card are inspired from that. I have embossed a piece of white card and coloured it using Dusty concord distress ink. The card blank is a soft mint colour.

I like the card so much that I decided that It would be perfect for Sue.
Related Posts Plugin for WordPress, Blogger...