Pages

Showing posts with label Vintage Photo. Show all posts

Friday, 9 November 2012

Such a long time

It has been ages since I have posted anything on here.  I have been busy doing stuff in RL, but I have found time to do a fair bit of crafting.

I have finally put he handle on this one.  I'm so pleased with how it turned out.


This started life as a pale wooden (pine I think) tea box that I bought on eBay.  I started off by staining it using Tea Dye distress stain.  Tea dye is my favourite colour in the distress range.  It gets used on almost every thing.

I then stamped it all over using vintage photo distress ink and a Tim Holtz script stamp.


I seen to have a thing about time lately.  Lots of cogs and clocks appearing on everything.  I love any thing that smacks of steampunk (NOT just sticking a cog on it) so I had a dig through my collection of steampunk charms and embellies.


I have added a few stamped clocks using brushed corduroy   The cogs and clocks where coloured using tea dye, vintage photo, aged mahogany and a bit of bronze acrylic paint.


A friend of mine gave me some stamped images.  This heart seemed to beg to go here.  It covered the seam of the box, so I had fun with a scalpel cutting it so that the box would still open.

I have another three projects on the go, so hopefully I will be posting again soon.

Happy crafting every one.

Sunday, 4 September 2011

Locked in Green

It is very rare for me to make a green card.  I'm not sure why, but I've given it a go for this card.  I've had a go a putting together a Steampunk Grunge card.  Not sure what I was doing, but I had fun.  Youtube is your friend when it comes to research.


I didn't have any cogs and I kept seeing them on steampunk cards, so I had a go at making some myself using some build a snowflake dies.  Many of the elements of this card have been copper leafed and embossed.  I also embossed the backing paper that I created using distress inks.  For full details on how I put this card together look here.


This is a close up of some of the elements that I made or coloured.  The little key on the right was a gold coloured earring that I took the back off of.  The heart (originally silver coloured) was a charm from a necklace that I bought and posted a little while ago.  The buttons were also originally silver coloured.


Lots of touches of gold pen on this image.  I have dragged a bit of vintage photo ink over the image as it stood out too much from the rest of the card.


This is a clearer image of the dry embossing.

I will be entering this card in the following challenges:

Fab N Funky - Go mad with embossing
Kenny K - Vintage / Grunge
Stamp Something - Use a Digi stamp

Wednesday, 18 May 2011

Apples in Distress

I have called this one "Apples in Distress" because the colours I have used are candy apple red and apple green.


This is my second attempt at making one of these cards (My first is called Ruffles).


I love working with my distress inks, but I have restrained myself some what and have only used Vintage Photo on this one.  I have done my version of distressed embossing (brush of a bit of the embossing powder before heating and don't let it achieve a smooth finish) think Tim Holtz.  the edges of the paper have been distressed using my ranger distressing tool.


The Crafty Pad challenged us to use  "holes" in our project, so I have made an aperture.  Quite easy to do with this design of card.  The Corrosive challenge asked for a birthday card.


I will also be entering this one for the challenge at Kaboodle Doodles,  who have a tic tac toe challenge.  I chose flowers, die cut and embossing.

Saturday, 16 April 2011

Chocolate Orange

If you caught my post yesterday, you will know that I am currently experimenting with my distress inks.  I've been eyeing up a few demos on timholtz.com to get some new ideas and I am starting to get a bit braver with trying things out.


Starting with a sheet of white paper I dabbed on Spiced marmalade and sprayed with water, did the same again with Tea dye and then finished off with Vintage photo.  I stamped the floral flourishes in Vintage photo and then embossed with some gold embossing power.  Now I don't have any distress embossing powder (definitely on my wish list) but I have attempted to get the same effect  by brushing some of the embossing power off before heating.

I loved the shimmer effect I got yesterday using the iridescent embossing powder, so I have done the same again (lightly sprinkle over some dabbed on distress ink and then heat).  It gives the paper a slightly rough feel and you can only see the glimmer when the card is facing a certain way, but I think it is worth it..

The colour scheme for this card came from the photo inspiration challenge at Paperplay challenges.  I don't know why, but chocolate and orange were the first things I thought of, so I ran with it.  That fit in very nicely with the chocolate challenge at Moving along with the times and the design came from the sketch at Everybody art.

If anyone has any comments tips or ideas for how I can improve my technique with distress ink, they are most welcome.  I love learning new things and blogging is a great way to do this xx

Saturday, 2 April 2011

Quilted Flowers

I haven't made an aperture card in ages, so I thought I would give it a go :0)  I started this one by folding a white sheet of A4 card in half and then trimming one inch from the front.  I added a strip of lace using DS tape and then covered the front with some card that I have had in my stash for years.  This one  is called Tasty cranberry by Memories complete.  I then used my nesties to cut the aperture and make the brown frame.


I used a piece of cream textured card stock inside the card and stamped along the edge using vintage photo distress ink.  I very rarely stamp in black any more as I find that browns can often give a softer finish.  Some times only black will do though :o)  I edged my stamped image with worn lipstick distress ink and then added lace. Lining your image up with your aperture is easy when you know how.  I line mine up in the aperture itself  and then close the card.     


Flowers next.  I'm still working on using multiple flowers on cards.  I think I am getting the knack of it now.  I added a bit of glitter glue to the tips of the flowers and to the flowers that I stamped on the edge for a bit of extra glitz.  The stamps that I have used came free with a magazine that I bought recently.


The sketch for this card came from this weeks challenge over at Card Patterns and I will also be entering this card for the challenge over at Allsorts Challenge Blog, who asked us to use flowers.

Sunday, 27 March 2011

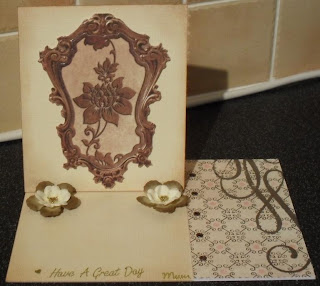
Framed for Mum

I love my mum to bits.  She has always been my rock and I can't imagine life with out her.  This is the card that I made her for mothers day.  Actually, it's probably the third, because I keep feeling that I could do better.


This one started life as an A4 sheet of white card.  I have added some cream textured card stock, which I have inked with tea die and vintage photo distress inks.  The flower and frame are fro Kanban I think.  The card stock that I used on the right hand side is foam flocked so all of the pattern is raised and very tactile.

I'm entering this one for the following challenges:
Allsorts Challenge Blog - For a special lady

Tuesday, 22 February 2011

Star Man

Bizzy Becs Creatalicious Challenge asked us to make a male card this month.  We needed to include 3 stars and the colour brown.  I started off by embossing 3 die cut stars and then colouring them with Broken china, aged mahogany and black soot distress inks.  I was going for a rusted blue metal look.  I'm trying to use up old stash so that I can justify buying new stash, so I have been digging through my paper drawers and found some buttery card and some brown spotty paper from a HOTP paper pack years ago.


I have used a digi stamp that I got ages ago and I have edged it with Vintage photo and Tea dye distress inks.  I edged everything with black glitter for some sparkle and added a black button with a black bow to finish off.

I will also be entering this card for the challenge at Craft Your Passion who also asked for a male card and Totally Papercrafts who asked us to use digi stamps.
Related Posts Plugin for WordPress, Blogger...